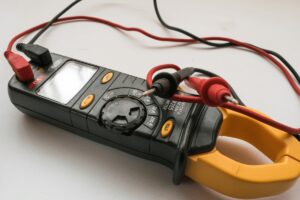
Why Fluke 113 Is the Only Multimeter You’ll Ever Need [Full Review + Test Results]
When it comes to reliable electrical measurements, the name Fluke always stands out. If you are searching for a multimeter that is simple enough for everyday tasks yet powerful enough for professional use, the Fluke 113 Multimeter might just be the perfect fit. In this Fluke 113 multimeter review, we’ll dive deep into its features, specifications, performance, usage guide, and why it continues to earn the trust of electricians and technicians worldwide.
Introduction to Fluke 113 Multimeter
As someone with over 10 years of experience in the electrical and maintenance industry, I’ve tested countless multimeters under tough real-world conditions. The Fluke 113 stands out for combining professional-grade accuracy with ease of use, making it ideal for beginners and experts alike.
Fluke 113 Specifications Overview
Here’s a closer look at its key technical specifications:
- True RMS for precise AC measurements
- Voltage Range: 0.1 mV to 600 V AC/DC
- Resistance Measurement: Up to 60 kΩ
- Continuity and Diode Test: Supported
- Capacitance Measurement: 1 nF to 9999 μF
- Display: 6000-count large backlit LCD
- Battery Life: Up to 300 hours without backlight
- Safety Rating: CAT IV 600 V
These specifications ensure versatility and reliability for residential, commercial, and light industrial tasks.
Understanding the Fluke 113 Multimeter Parts and Controls
The Fluke 113 multimeter is designed with simplicity and efficiency in mind. Knowing its parts and controls is essential for using the device effectively and safely.
![Why Fluke 113 Is the Only Multimeter You’ll Ever Need [Full Review + Test Results] 1 Fluke 113 Multimeter Front Panel Diagram](http://mme-ae.com/wp-content/uploads/2025/05/list-of-the-features-for-each-display.webp)
Fluke 113 Display Symbols Table
| No. | Symbol | Description |
|---|---|---|
| 2 | 📢 Continuity | Continuity test function is active |
| 3 | ➡️ Diode | Diode test function is active |
| 4 | – Negative Input | Negative input voltage indication |
| 5 | ⚡ Unsafe Voltage | Hazardous or over-voltage detected |
| 6 | HOLD | Displayed reading is frozen (Hold active) |
| 9 | LoZ | Low impedance voltage or capacitance measurement |
| 10 | nF/μF/mV/Ω/kΩ/kHz | Measurement unit indicators |
| 11 | AC/DC | AC or DC voltage measurement indicator |
| 12 | 🔋 Battery | Low battery warning |
| 13 | 600000 mV | Indicates selected measurement range |
| 14 | 📊 Bar Graph | Analog-style bar graph display |
Power Up Options Table
![Why Fluke 113 Is the Only Multimeter You’ll Ever Need [Full Review + Test Results] 2 Power Up Options Table](http://mme-ae.com/wp-content/uploads/Power-Up-Options-Table.webp)
| Button | Power-Up Options |
|---|---|
| HOLD | Turns on all display segments until button is released. |
| MIN MAX | Disables beeper. bEEP shows when enabled. |
| RANGE | 113 – Turns on all display segments until button is released. 115, 117 – Enables low impedance capacitance measurements. LFCAP shows when enabled. |
| [Blank Button] | Disables Battery Saver™ (Sleep mode). PoFF shows when enabled. |
| ☀️ (Backlight Button) | Disables auto backlight off. LoFF is displayed when enabled. |
Fluke 113 Terminal Table
![Why Fluke 113 Is the Only Multimeter You’ll Ever Need [Full Review + Test Results] 3 Fluke 113 Terminal](http://mme-ae.com/wp-content/uploads/2025/05/list-of-terminals-on-the-Meter.webp)
| No. | Terminal Name | Description |
|---|---|---|
| 2 | COM | Common terminal for all measurements |
| 3 | VΩ | Input for voltage, resistance, continuity, capacitance, and diode testing |
How to Operate the Fluke 113 Multimeter: A Complete Beginner’s Guide
Measuring AC/DC Voltage
![Why Fluke 113 Is the Only Multimeter You’ll Ever Need [Full Review + Test Results] 4 Measuring Ac/Dc Voltage](http://mme-ae.com/wp-content/uploads/2025/05/Measuring-AC-and-DC-Voltage.webp)
In the Fluke 113 digital multimeter, measuring AC and DC voltage is both simple and accurate. To begin, turn the rotary switch to the V CHEK position. This special function automatically detects whether the voltage is AC or DC, eliminating the need for manual selection. Once the test leads are connected to the circuit, the measured voltage appears on the display. If the voltage is alternating current, the AC symbol will appear; if it is direct current, the DC symbol will be shown. Additionally, by pressing the RANGE button, you can switch from auto-ranging to manual mode and select between 6V, 60V, or 600V ranges. This is useful when more stable readings or higher accuracy in a specific range are required. The Fluke 113 is designed to make this process easy and reliable for both general users and professional technicians.
- Insert the black lead into the COM terminal.
- Insert the red lead into the VΩ terminal.
- Set the rotary switch to the V (AC or DC) position.
- Touch probes to the circuit/component.
- Read the displayed value.
Measuring Resistance or Continuity
![Why Fluke 113 Is the Only Multimeter You’ll Ever Need [Full Review + Test Results] 5 Measuring Resistance](http://mme-ae.com/wp-content/uploads/2025/05/Measuring-Resistance-or-Continuity.webp)
In the Fluke 113 digital multimeter, measuring resistance or checking continuity is straightforward and efficient. To perform these measurements, turn the rotary switch to the Ω/continuity position. When measuring resistance, the multimeter will display the resistance value in ohms (Ω) on the screen. For continuity testing, if the circuit is complete (low resistance), the meter emits an audible beep, making it easy to identify closed paths without having to look at the screen. If you prefer manual range selection for resistance, press the RANGE button to switch between predefined measurement ranges such as 600 Ω, 6 kΩ, and 60 kΩ. This manual adjustment can improve accuracy and stability in specific testing conditions. The Fluke 113’s combination of visual readings and audible indicators makes it a reliable tool for both professional and everyday electrical testing.
- Insert leads as above.
- Set the dial to the Ω/continuity position.
- Probe the component.
- Look for reading or beep (continuity).
Testing for Continuity
![Why Fluke 113 Is the Only Multimeter You’ll Ever Need [Full Review + Test Results] 6 Testing For Continuity](http://mme-ae.com/wp-content/uploads/2025/05/Testing-for-Continuity.webp)
In continuity testing, a multimeter is used to quickly check for open circuits (breaks) or short circuits (unexpected connections) in electrical paths such as wires, fuses, or printed circuit boards. Using the continuity function is a fast and convenient method to identify these issues, often indicated by an audible beep when a connection is present. However, for maximum accuracy when measuring resistance, it is recommended to use the meter’s resistance (Ω) function, as it provides a precise numerical value of the resistance rather than just indicating whether a path is open or closed.
Measuring Capacitance
![Why Fluke 113 Is the Only Multimeter You’ll Ever Need [Full Review + Test Results] 7 Measuring Capacitance](https://mme-ae.com/wp-content/uploads/Measuring-Capacitance.jpg)
In the Fluke 113 multimeter, measuring capacitance is also possible, but with an important distinction: this function is not automatically performed through the V CHEK mode. To accurately measure a capacitor’s value, the capacitor must first be removed from the circuit and connected directly to the multimeter. Then, by turning the rotary switch to the dedicated capacitance measurement setting (usually indicated by the capacitor symbol “||” or a similar icon), the device will display the capacitance value numerically on the screen.
- Insert leads.
- Turn dial to capacitance mode.
- Probe capacitor.
- Wait for stable reading.
Diode Testing
- Insert leads.
- Set dial to diode test.
- Probe diode terminals.
- Check voltage drop.
The image illustrates four different scenarios for testing a diode using a digital multimeter, helping to determine whether the diode is good or faulty. In the first case, where the diode is good and placed in forward bias (red probe to anode and black probe to cathode), the multimeter displays a reading of approximately 0.6 volts, and a single beep is heard—indicating current flow through the diode. In the second scenario, the same good diode is tested in reverse bias (probes reversed), and the multimeter shows “OL” (open loop), with no beep, which is expected since no current should flow in this direction. For faulty diodes, two possibilities are shown: if the diode is open (broken), the multimeter will show “OL” in both directions and emit no sound, indicating no current flow. If the diode is shorted, the multimeter displays zero or a very low value in both directions and beeps continuously, indicating that current flows freely in both directions—a sign of a defective diode. These four visual examples make it easy to diagnose the condition of a diode accurately.
![Why Fluke 113 Is the Only Multimeter You’ll Ever Need [Full Review + Test Results] 8 Diode Testing](https://mme-ae.com/wp-content/uploads/Diode-Testing-1.jpg)
Key Features and Advantages of Fluke 113
True RMS Accuracy for Reliable Measurements
Simple Operation for Everyday Testing
Durable Build for Tough Environments
Precise AC Voltage Testing with LoZ Input
Long-Lasting Battery and Bright Display
Pros and Cons of Fluke 113
ProsCons
- True RMS accuracy
- Rugged and durable design
- CAT IV 600 V safety rating
- Excellent battery life
- Simple user interface
“I’ve been using the Fluke 113 daily for HVAC troubleshooting. The LoZ mode is incredibly useful, and the True RMS gives me confidence in every reading. Highly recommend it!”Ahmad S HVAC Technician
“The Fluke 113 is a lifesaver for quick diagnostics. The simplicity and reliability are unmatched. As a residential electrician, I can’t imagine going back to cheaper brands!”Khalid Certified Electrician
“Fluke 113’s large display and simple operation save me so much time during inspections. The HOLD button is a game-changer when working in awkward spaces!”Ali Facility Maintenance Supervisor
“Over the past five years, my Fluke 113 has survived drops, dust, and heavy use. It’s still working like new. Worth every penny.”Mark D Field Service Technician
“As a beginner, I was intimidated by professional meters. But the Fluke 113 made it easy. Clear instructions, rugged design, and accurate measurements — everything I needed!”Ben C Electrical Engineering Student
If you’re unsure whether Fluke 113 is right for you, check out our complete comparison between Fluke 113 and 114 to see how it stacks up against the Fluke 114.


 AUTHORIZED PARTNER





![Why Fluke 113 Is the Only Multimeter You’ll Ever Need [Full Review + Test Results]](https://creative-engs.com/wp-content/uploads/2025/05/Why-Fluke-113-Is-the-Only-Multimeter-Youll-Ever-Need-Full-Review-Test-Results.webp )

